Opening a Demat account is the first step toward investing in the stock market, IPOs, and mutual funds. If you are searching for how to open Zerodha Demat account, this detailed guide will help you complete the entire process smoothly.
The good thing about the Zerodha account opening process is that it is completely online. You do not need to visit any branch or submit physical documents. From mobile verification to Aadhaar e-sign, everything can be completed from your smartphone or laptop within a few minutes.
Table of Contents
- Documents Required for Zerodha Demat Account Opening
- Why Choose Zerodha for Demat Account Opening?
- How to Open Zerodha Demat Account Step by Step
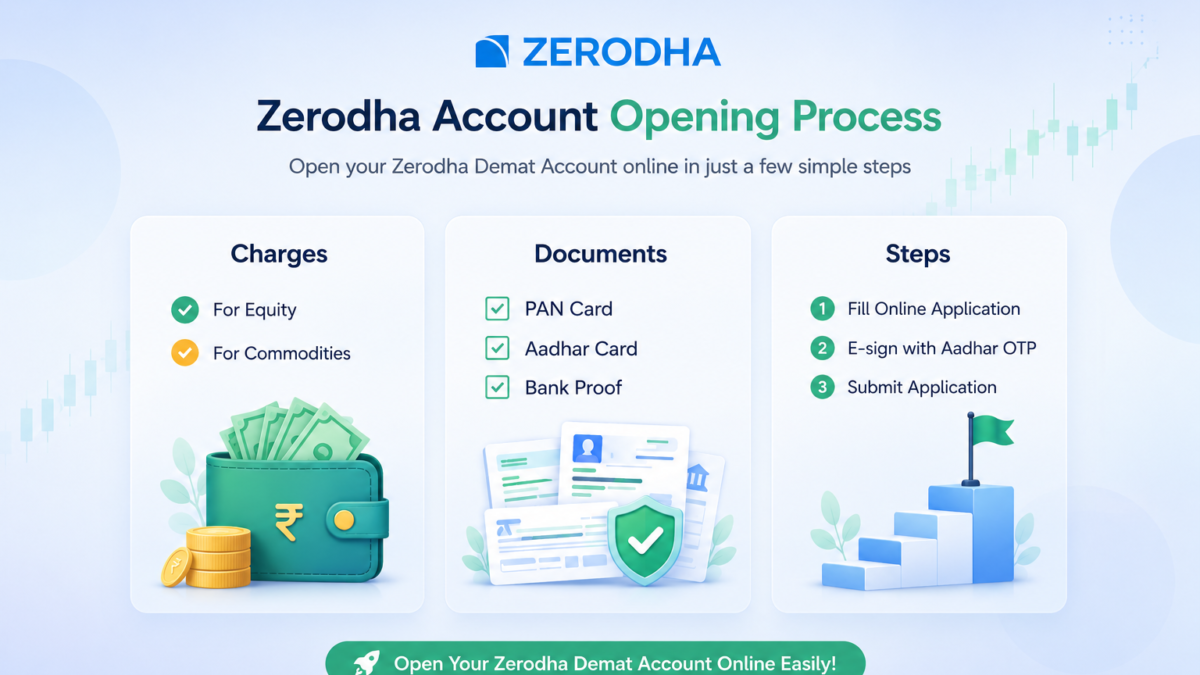
- Step 1: Visit Zerodha Demat Account Opening Page
- Step 2: Verify Mobile Number for Zerodha Account Opening
- Step 3: Enter Your Name and Email Address
- Step 4: Verify Your Email ID
- Step 5: Enter PAN Details for Zerodha Demat Account
- Step 6: Select Trading Preferences
- Step 7: Enter Aadhaar Number
- Step 8: Verify Aadhaar OTP
- Step 9: Select Your Address
- Step 10: Fill Basic Personal Information
- Step 11: Link Bank Account in Zerodha
- Step 12: Verify Bank Details
- Step 13: Complete Webcam Verification
- Step 14: Upload Documents for Zerodha Account Opening
- Step 15: Add Nominee Details
- Step 16: Complete Aadhaar E-Sign Process
- Step 17: Submit Application Successfully
- Step 18: Set Zerodha Kite Password
- How Long Does Zerodha Demat Account Opening Take?
- Conclusion
- Frequently Asked Questions (FAQs)
Documents Required for Zerodha Demat Account Opening
Before starting the Zerodha account opening process, keep these documents ready :
- PAN Card
- Aadhaar Card linked with mobile number
- Active mobile number
- Active email ID
- Bank account
- Signature on white paper
- Cancelled cheque or bank statement
Make sure all details match correctly across documents to avoid rejection or delays.
Zerodha Demat Account Opening Charges
- ₹0 Account Opening Charges
- ₹0 brokerage on equity delivery
- Flat ₹20 per order for intraday & F&O
- Account Maintenance Charge: ₹300 per year
- No other hidden costs
Why Choose Zerodha for Demat Account Opening?
Here’s why Zerodha stands out:
- Low and transparent charges
- Fully online account opening process
- Fast activation (usually within 24–48 hours)
- Advanced yet simple trading platforms
- Free stock market education
How to Open Zerodha Demat Account Step by Step
Below are the real steps involved in opening a Zerodha account online.
Step 1: Visit Zerodha Demat Account Opening Page
Go to the official Zerodha account opening page. You will see a screen saying “Open a free demat and trading account online”.
Enter your mobile number in the provided field and click on the Get OTP button to continue.

Step 2: Verify Mobile Number for Zerodha Account Opening
Zerodha will send a One-Time Password (OTP) to your registered mobile number.
Enter the OTP correctly and click on the Continue button. This step verifies your mobile number and begins your account registration process.

Step 3: Enter Your Name and Email Address
Now, enter your Full Name and Email Address. After entering the details, click on Continue.
Zerodha will use this email for communication, account updates, and verification purposes.

Step 4: Verify Your Email ID
You will receive an OTP on your registered email address.
Enter the email OTP and click on Continue to verify your email successfully.

Step 5: Enter PAN Details for Zerodha Demat Account
In this step, Zerodha will ask for the PAN Card Number and Date of Birth.
Make sure the date of birth matches exactly with your PAN card details.
Incorrect PAN or DOB details may result in account rejection.

Step 6: Select Trading Preferences
Zerodha will now ask which segments you want to activate.
You will usually see:
- Equity & Mutual Funds
- Futures & Options
- Commodity
If you are a beginner, selecting the default Equity & Mutual Funds option is recommended.
Click on Continue.

Step 7: Enter Aadhaar Number
Now enter your Aadhaar number carefully and click on Continue.
This is required for online KYC and digital verification.

Step 8: Verify Aadhaar OTP
You will receive an OTP on the mobile number linked with your Aadhaar card.
Enter the OTP and Zerodha will automatically process your Aadhaar verification.

Step 9: Select Your Address
After Aadhaar verification, your saved address details will appear automatically.
Choose the correct address and click on Continue.

Step 10: Fill Basic Personal Information
Now you need to enter some personal and financial details such as:
- Father’s Name
- Mother’s Name
- Marital Status
- Annual Income
- Trading Experience
- Occupation
These details are required for KYC and regulatory compliance.
After entering the details, click on Continue.

Step 11: Link Bank Account in Zerodha
You can link your bank account using two methods:
- Link with UPI
- Enter details manually
Using the UPI method is easier and faster.
Scan the QR code using any UPI app and make a payment of ₹1 for verification.

Step 12: Verify Bank Details
Once the ₹1 payment is successful, Zerodha automatically fetches your bank details including:
- Account Number
- IFSC Code
- MICR Code
- Bank Name
Verify all details carefully and click on Continue.

Step 13: Complete Webcam Verification
Now Zerodha will ask for webcam verification.
Click on Capture and take a clear live photo using your webcam or mobile camera.
This step is mandatory for identity verification.

Step 14: Upload Documents for Zerodha Account Opening
You now need to upload Signature proof and Bank proof.
Accepted formats are JPG, JPEG and PDF.
Maximum file size allowed is usually 7.5 MB.
For signature proof:
- Sign on white paper using blue or black pen
For bank proof upload any one from below:
- Cancelled cheque
- Bank statement
- Passbook first page

Step 15: Add Nominee Details
You can Add a nominee now or Skip and do it later.
Adding a nominee is recommended for better account security and future claim purposes.
Click on Continue.

Step 16: Complete Aadhaar E-Sign Process
This is the final verification step.
Click on Continue and then click on Sign Now.


Enter your Aadhaar number again and verify using OTP received on your Aadhaar-linked mobile number.
Click on Proceed.

Step 17: Submit Application Successfully
After completing e-sign verification, your application will be submitted successfully.
Zerodha will review your application and verification may take up to 24 hours.
You will also receive your User ID for Kite login.

Step 18: Set Zerodha Kite Password
Click on Login to Kite and reset your password.
Create a strong password and save it securely.
After setting the password, your Zerodha account setup is almost complete.

How Long Does Zerodha Demat Account Opening Take?
In most cases, Zerodha activates the account within 24 hours after successful verification.
However, delays can happen if:
- Documents are unclear
- PAN details mismatch
- Signature is incorrect
Conclusion
Now you know exactly how to open Zerodha Demat account online step by step. The entire process is simple, paperless, and beginner-friendly.
From mobile verification to Aadhaar e-sign, Zerodha has made the account opening experience smooth and fast. If your documents are ready, you can complete the process within a few minutes and start your stock market investing journey.
If you are planning to invest in IPOs after opening your account, you can also check the latest IPO GMP updates before applying.